Showing posts with label Related post widgets. Show all posts

Beautiful related posts text widget with hover effect for blogger

26 Comments
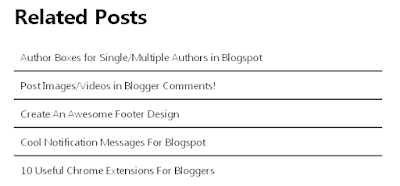
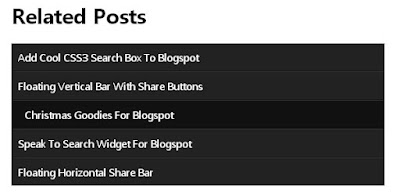
Simple And Stylish "Related Posts" Text Widget For Blogspot

I am going to post three awesome styled Text only related post widget for blogger. I really post this for my friend Rohit Malik ,who asked me for this widget . Actually, related posts widget decrease your blog's bounce rate. Also many related posts widget for blogger look boring and ugly. An those having images will increase up your blog loading time.This related post has no image and loads faster.So, hope you like all of the three.


Features:


1.) Simple With 3-Stylish Design.
2.) Page Counter.Dark And Light Effect.
3.) Only Text To Remain Your Blog Loading Speed Fast.

How To Add In Blogspot?

1.) Go To Your Blogger Dasboard
2.) Open Your Desire Blog.
3.) Go To HTML.
4.) Click "Edit HTML"
5.) Check On "Expand Widget Template"
6.) Now Do As I Did.
7.) Find This Line Using Ctrl+F Function.

</head>

And Copy The Below JavaScript Code And Paste It Before/Above It.


<!--RelatedPostsStarts-->
<script language='JavaScript'>
//<![CDATA[
var relatedTitles = new Array();
var relatedTitlesNum = 0;
var relatedUrls = new Array();
function related_results_labels(json) {
for (var i = 0; i < json.feed.entry.length; i++) {
var entry = json.feed.entry[i];
relatedTitles[relatedTitlesNum] = entry.title.$t;
for (var k = 0; k < entry.link.length; k++) {
if (entry.link[k].rel == 'alternate') {
relatedUrls[relatedTitlesNum] = entry.link[k].href;
relatedTitlesNum++;
break;
}
}
}
}
function removeRelatedDuplicates() {
var tmp = new Array(0);
var tmp2 = new Array(0);
for(var i = 0; i < relatedUrls.length; i++) {
if(!contains(tmp, relatedUrls[i])) {
tmp.length += 1;
tmp[tmp.length - 1] = relatedUrls[i];
tmp2.length += 1;
tmp2[tmp2.length - 1] = relatedTitles[i];
}
}
relatedTitles = tmp2;
relatedUrls = tmp;
}
function contains(a, e) {
for(var j = 0; j < a.length; j++) if (a[j]==e) return true;
return false;
}
function printRelatedLabels() {
var r = Math.floor((relatedTitles.length - 1) * Math.random());
var i = 0;
document.write('<ul>');
while (i < relatedTitles.length && i < 6) {
document.write('<li><a href="' + relatedUrls[r] + '">' + relatedTitles[r] + '</a></li>');
if (r < relatedTitles.length - 1) {
r++;
} else {
r = 0;
}
i++;
}
document.write('</ul>');
}
//]]>
</script>
<!--RelatedPostsStops-->


8.) Now Copy The Below HTML Code And Paste It Where You Want To Show Related Posts Widget.

Like I Suggest To Find These Line Using Ctrl+F Function.


<div class='post-footer-line post-footer-line-2'/>
<div class='post-footer-line post-footer-line-3'/>
</div>
</div>


And Edit The Below HTML Code Then Copy It And Paste It Below/After It.


<b:if cond='data:blog.pageType == &quot;item&quot;'>
<div id='related-posts'>
<b:loop values='data:post.labels' var='label'>
<b:if cond='data:label.isLast != &quot;true&quot;'>
</b:if>
<b:if cond='data:blog.pageType == &quot;item&quot;'>
<script expr:src='&quot;/feeds/posts/default/-/&quot; + data:label.name + &quot;?alt=json-in-script&amp;callback=related_results_labels&amp;max-results=5&quot;' type='text/javascript'/></b:if>
</b:loop>
<script type='text/javascript'>
var currentposturl=&quot;<data:post.url/>&quot;;
var maxresults=5<!-- Increase To Show More Then 5 Related Post -->
removeRelatedDuplicates(); printRelatedLabels();
</script>
</div>
</b:if>


9.) Next, Find The Below Line Using Ctrl+F Function:

]]></b:skin>

Final, Choose Any One Style, And Insert The Corresponding CSS Code Above It.


Style 1:-

Simple And Stylish "Related Posts" Text Widget For Blogspot


#related-posts {clear: both;}
#related-posts ul{margin: 20px 0; padding: 0;list-style: none;}
#related-posts ul li {border-top: 1px solid #333;border-bottom: 1px solid #111;}
#related-posts ul li:first-child {border-top: none;}
#related-posts ul li:last-child {border-bottom: none;}
#related-posts ul li a {padding: 10px;display: block;color: #222;text-decoration: none;cursor: pointer; -webkit-transition: padding-left 250ms ease-out; -moz-transition: padding-left 250ms ease-out; /* trans pattern: property duration timingMethod delay */}
#related-posts ul li a:hover {padding-left: 20px;}


Style 2:-

Simple And Stylish "Related Posts" Text Widget For Blogspot


#related-posts {clear: both;}
#related-posts ul{margin: 20px 0; padding: 0;list-style: none;}
#related-posts ul li {border-top: 1px solid #333;border-bottom: 1px solid #111;background: #222;}
#related-posts ul li:first-child {border-top: none;}
#related-posts ul li:last-child {border-bottom: none;}
#related-posts ul li a {padding: 10px;display: block;color: #fff;text-decoration: none;cursor: pointer; -webkit-transition: padding-left 250ms ease-out; -moz-transition: padding-left 250ms ease-out; /* trans pattern: property duration timingMethod delay */}
#related-posts ul li a:hover {padding-left: 20px;background: #111;}


Style 3:-

Simple And Stylish "Related Posts" Text Widget For Blogspot


#related-posts {clear: both;}
#related-posts h2{color: #fff;}
#related-posts ul{margin: 20px 0; padding: 0;list-style: none;}
#related-posts ul li {border-top: 1px solid #333;border-bottom: 1px solid #111;background: #222;}
#related-posts ul li:first-child {border-top: none;}
#related-posts ul li:last-child {border-bottom: none;}
#related-posts ul li a {padding: 10px;display: block;color: #fff;text-decoration: none;cursor: pointer; -webkit-transition: padding-left 250ms ease-out; -moz-transition: padding-left 250ms ease-out; /* trans pattern: property duration timingMethod delay */}
#related-posts ul li a:hover {padding-left: 20px;background: #111;}

I hope this widget will help you in increasing your SEO and Bounce Rate.Happy blogging!!!!!
Read More

How to list recent post titles by label

4 Comments

Do you want to list all or your most recent posts according to categories/labels? Well then, you’ve come to the right tutorial.
I’ve seen people use a LinkList gadget to accomplish this. However this method requires them to MANUALLY add each post link to the gadget every time they publish a post with the specified label. Not good.
list post by label 1
We’re not going to do that, because we have a better, more elegant solution. Once added, the list will update itself automatically. The widget takes your blog’s label-specific feed, in JSON format and turn it into a list using Javascript. It other words it does the listing for you.
No more slow and tedious manual updating and rearranging. Sounds good? Here we go:

1. Installing the first list

  1. Go to Layout Design>>Page Elements.
  2. Click Add A Gadget.
  3. In Add A Gadget window, select HTML/Javascript .
  4. Enter a label as the title of your widget.
  5. Copy the code below and paste it inside the content box.
  6. Click Save.
<!-- Recent Posts by Label Start --> <!-- code by http://truebloggertricks.blogspot.com/ --> <script type="text/javascript"> function recentpostslist(json) { document.write('<ul>'); for (var i = 0; i < json.feed.entry.length; i++) { for (var j = 0; j < json.feed.entry[i].link.length; j++) { if (json.feed.entry[i].link[j].rel == 'alternate') { break; } } var entryUrl = "'" + json.feed.entry[i].link[j].href + "'";//bs var entryTitle = json.feed.entry[i].title.$t; var item = "<li>" + "<a href="+ entryUrl + '" target="_blank">' + entryTitle + "</a> </li>"; document.write(item); } document.write('</ul>'); } </script> <script src="YOUR_BLOG_URL/feeds/posts/summary/-/YOUR_LABEL?max-results=SHOW_HOW_MANY&alt=json-in-script&callback=recentpostslist"></script> <span style="font-size: 80%; float:right;">Get this? <a href="http://truebloggertricks.blogspot.com/2012/09/how-to-list-recent-post-titles-by-label.html">widget</a></span> <!-- Recent Posts by Label End -->
  • Replace YOUR_BLOG_URL in code line 21 with your own blog URL. For example if you were to list posts from truebloggertricks.blogspot.com/, you would have to replace it with http://truebloggertricks.blogspot.com/ (without the trailing slash).
  • Replace YOUR_LABEL (line 21) with the label. Labels are case sensitive, make sure you get it right.
  • Replace the value of SHOW_HOW_MANY (line 21) with the number of posts you want to display. To show all posts, use 500 (I believe 500 is the maximum. If you have more than 500 posts under a certain label, do leave a comment, we’ll work something out).
  • The titles are bulleted due the use of ordered list <ul>. If you want them numbered instead, just replace ul (in line 5 and 18) with ol.

2. Adding subsequent lists

You need to add a HTML/Javascript gadget for each label. Repeat the same steps above for each label, with a slight difference:
  • You don’t have to copy the whole code. Just copy the codes in lines 21 and 22 into each gadget.
  • Make sure your first list (which contains the full code) is positioned on top of all other lists.
Enjoy!
Read More

Recommended post widget for blogger

The Recommended Post slide Out Widget is an invitation to the reader to read any other post once he has read one of your blog entries. It's both useful for you (can improve your Click Through Rate (CTR) ) and for your blog visitors too.

Demo


recommended post, widget, design


How to add the Recommended Post Slide out Widget

1. Log in into your Blogger account, then go to Design (or Layout) > Page Elements
2. Click on Add a Gadget Link
3. Choose "HTML/JavaScript" option
4. Paste this code inside the empty box:

<div id="hlslidein" style="display:none;"> <div class="help">?</div><div class="expand">+</div> <div class="close">X</div> <p>Recommended for you</p> <div id="hlslidein_image"></div> <div  id="hlslidein_title">Loading..</div> </div> <script> if(document.location.href.split("/").length==6&&document.location.href.indexOf(".html")!=-1){if(typeof hl_onload_queue=='undefined')var hl_onload_queue=[];if(typeof hl_dom_loaded=='boolean')hl_dom_loaded=false;else var hl_dom_loaded=false;if(typeof hl_async_loader!='function'){function hl_async_loader(src,callback,id){var script=document.createElement('script');script.type="text/javascript";script.async=true;script.src=src;script.id=id;var previous_script=document.getElementById(id);if(previous_script)if(previous_script.readyState=="loaded"||previous_script.readyState=="complete"){callback();return}else{script=previous_script}if(script.onload!=null)previous_callback=script.onload;script.onload=script.onreadystatechange=function(){var newcallback;if(previous_script&&previous_callback)newcallback=function(){previous_callback();callback()};else newcallback=callback;if(hl_dom_loaded){newcallback()}else hl_onload_queue.push(newcallback);script.onload=null;script.onreadystatechange=null};var head=document.getElementsByTagName('head')[0];if(!previous_script)head.appendChild(script)}}if(typeof hl_domLoaded!='function')function hl_domLoaded(callback){hl_dom_loaded=true;var len=hl_onload_queue.length;for(var i=0;i<len;i++){hl_onload_queue[i]()}}hl_domLoaded();hl_async_loader("http://ajax.googleapis.com/ajax/libs/jquery/1.7.1/jquery.min.js",function(){hl_async_loader("http://yourjavascript.com/30910102822/recemmend post.txt.js",function(){},"hl-out-slide")},"jQueryjs")} </script> <a href="http://truebloggertricks.blogspot.in/2012/08/recommended-post-widget-for-blogger.html" target="_blank"></a>

5. Save The Widget.
6. Go to Edit HTML > Check the "Expand Widget Template" box
7. Search (CTRL + F) for the following code :

<div class='post-footer-line post-footer-line-1'>

OR

<p class='post-footer-line post-footer-line-1'>

OR

<data:post.body/>

Immediately below any of these lines, add the following snippet

<b:if cond='data:blog.pageType == "item"'>
<div style='display:none' id='bpslidein_place_holder'></div>
</b:if>

Now when the reader scrolls down to this div, the slide will open up.

8. Save your template. And that's it!
Read More

Related Posts Widget with thumbnail

Display thumbnails of posts having same labels or categories at the bottom of each blog page engages the reader more and increases the pageviews. By far we have two best related posts gadgets created so far one is by linkwithin which I am sharing in this tut and another one displays just links and I will share it in my next post. This widget Loads fast and you don't need to install any scripts for this as the widget codes are stored on linkwithin servers. This tutorial is the most detailed one ever written on linkwithin so kindly follow the steps carefully. Please see a demo first,

Add Linkwithin to Blogger

The steps are very simple:
  1. Go To Linkwithin
  2. Fill up the easy blanks and do as they say.


  3.   Keep the width to three stories i.e three thumbnails if your post width is less than 500px
  4.   Hit the Get Widget button and then click the Install Widget link on the next page as shown below,
related posts linkwithin
  5.   Change the Title to Related Posts: or anything you may like as shown below,
  6.  Now Click the Edit Template Link
related posts widget
  7.   Replace the code that you see with this one:
<b:includable id='main'><b:if cond='data:blog.pageType == &quot;item&quot;'><data:content/></b:if></b:includable>
The above code will hide the thumbnails from appearing on homepage.
  8.   Next click the Edit Content Link and add the following additional code just above the code inside the widget,
<script>linkwithin_text='Related Posts:'</script>
Replace Related Posts:  with any text you want.
   9.  Finally hit the ADD WIDGET button.
  10.  Once you are taken to the Page Elements page of your blogger account, simply drag the widget to the bottom of your post body as shown below,
related posts
   10.  Click the "Save" orange button at the top-right corner and you are done!
Let me know if you needed any further help on this. I hope the slight customization may prove helpful to you. Peace.

Read More